

TUTORIAL - LAPPED SEAMS
A PDF download of this tutorial is available HERE.
Lapped seams are used extensively in vintage sewing - especially in designs dated 1929 - 1935. This technique is useful where points, curves or other design lines would be difficult to stitch using the traditional right-sides-together method.
You can easily identify where a lapped seam will be used. Typically the instructions will read "Join using a lapped seam" - or something similar.
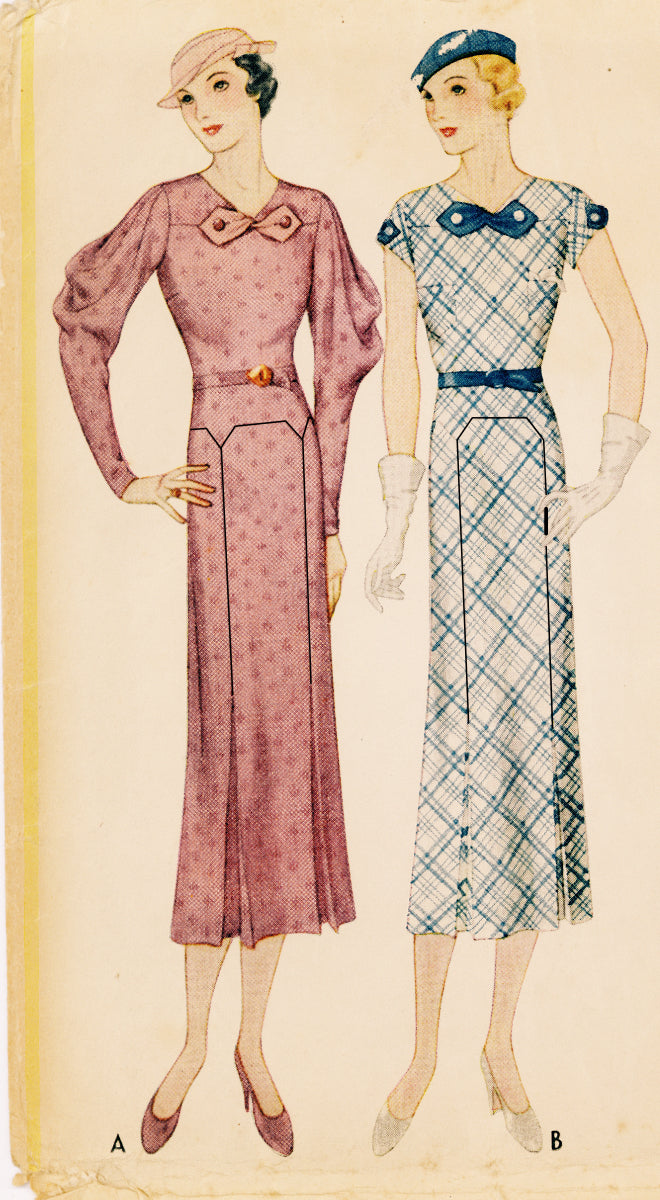
In the picture above areas were a lapped seam would be used, are drawn in with black. The points on the skirt on the left would be difficult to sew accurately, using a traditional method. The same for the skirt on the right.
A lapped seam is very easy to do, and requires only a few steps of preparation.

A lapped seam is constructed on the right side of the garment, and usually has two pieces with opposite shaping as shown in the picture above. Though sometimes the top piece will be shaped and the bottom will not.
When the seam is completed, one piece of fabric will be on top of the other. The "top" piece will be the one that has the seam allowance turned under, and the "bottom" piece will be the one that has the seam allowance only marked, but not turned.
Your pattern pieces may be shaped differently - but the technique for sewing is exactly the same.
Here I've cut the top piece from a print and the bottom piece from muslin - so it will be easier to see the technique.
STEP 01

Mark the seam allowance on the right side of both pieces.
For this tutorial, I have marked the seam allowance with a pen so that it's easy to see -- BUT-- don't use this on your garment. You want to make sure that whatever you use - it will be 100% removable.
STEP 02

Turn under the seam of the top piece to the wrong side, along the marked line, and baste to hold in position. (This is one time when basting rather than pinning really needs to be used!) You may need to clip into the seam allowance to get it to turn. Especially at that inner point. But just go slow, and take the tiniest of snips where needed.
Be sure to put the basting away from the folded edge, as eventually we will be machine stitching there.
Once the basting is done, press the piece, especially along the folded edge to get it nice and flat.
STEP 03

(Pieces pinned together, ready for the second basting)
Lay the top piece on top of the right side of the bottom piece. (The wrong side of the top piece will be against the right side of the bottom piece.) Match the folded edge of the top piece to the marked seam allowance of the bottom. Pin to hold in place. Then baste again through all layers to keep everything secure. Remove the pins.
STEP 04

Machine stitch as close as possible to the turned edge of the top piece. Go slowly, and pivot the fabric with the needle down in the piece at the point. (You will want to use thread that matches the color of your fabric. I've used black here, so that you can easily see it.)
When done with the stitching, remove all the basting and give the piece another pressing.
If you are using a heavy weight fabric, you can trim away the excess fabric/seam allowance on the back to reduce bulk.


0 comment